
KIA Niro: Inside rear view mirror
KIA Niro EV, Hybrid - Second generation - (SG2) (2021-2024) - Owner's manual / Features of your vehicle / Mirrors / Inside rear view mirror
Adjusting the day/night rear view mirror (if equipped)
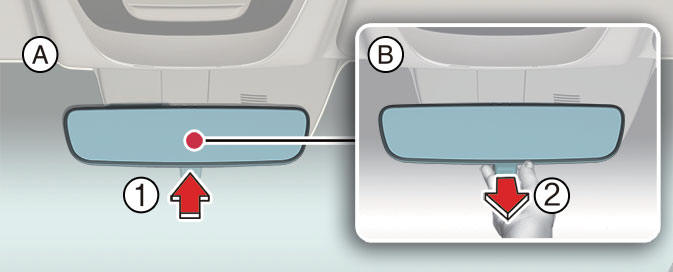
- Day
- Night
Operation
- Push the day/night lever (1) during daytime.
- Pull the day/night lever (2) to reduce the headlamp glare during low light and night driving conditions.
Electric Chromic Mirror (ECM) (if equipped)
The sensor detects the light level and automatically controls the headlamp glare during low light and night driving conditions.
WARNING
- Do not place objects in the rear seat or cargo area which would interfere with your vision out the rear window.
- Do not adjust the rear view mirror while the vehicle is moving. This could result in loss of control, and an accident which could cause DEATH, SERIOUS INJURY, or property damage.
- Do not modify the inside mirror and don't install a wide mirror. It could result in injury, during an accident or deployment of the air bag.
READ NEXT:
 Outside rear view mirror
Adjusting the outside rear view mirror
Operation
Move the outside rear view mirror
switch (1) to select the left or right side
of the mirror.
Adjust the mirror adjustment control
(2) to move the selected mirror.
WARNING
The ou
Auto reverse function (if equipped)
The outside rear view mirror will move
downwards when the vehicle is in R
(Reverse) position to assist reverse parking.
Operation
The outside rear view mirror switch (1)
position determines the mirror movement:
L/R: Outside rear view mir
SEE MORE:
Power Door Lock Module Repair procedures
Inspection
Warning
When removing with a flat-tip screwdriver or remover, wrap
protective tape around the tools to
prevent damage to components.
When removing the interior trim pieces, use a plastic panel
removal tool not to damage the
Piston, rings
Clean piston.
(1) Using a gasket scraper, remove the carbon from the piston top.
(2) Using a groove cleaning tool or broken ring, clean the piston ring grooves.
(3) Using solvent and a brush, thoroughly clean the piston.
Warning
Do not
Categories
- Home
- KIA Niro EV, Hybrid - Second generation - (SG2) (2021-2024) - Owner's manual
- Kia Niro - First generation - (DE) (2017-2022) - Service and Repair Manual
- Contact Us
