KIA Niro: Rear Bumper beam Assembly
Kia Niro - First generation - (DE) (2017-2022) - Service and Repair Manual / Body (Interior And Exterior) / Rear Bumper / Rear Bumper beam Assembly
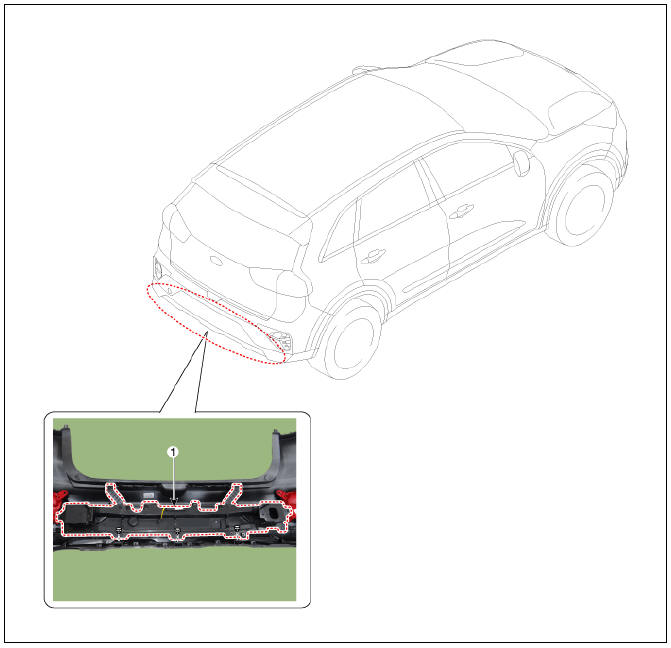
- Rear bumper beam assembly
Replacement
Warning
Put on gloves to protect your hands.
Warning
- Use a plastic panel removal tool to remove interior trim pieces without marring the surface.
- Be careful not to bend or scratch the trim and panels.
- Remove the rear bumper assembly.
(Refer to Rear Bumper - "Rear Bumper Assembly")
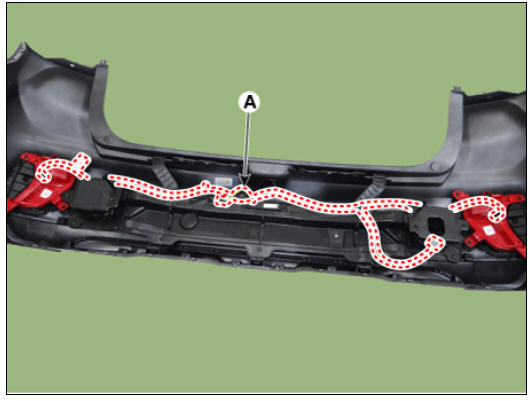
- Disconnect the rear bumper beam mounting wiring harness (A).
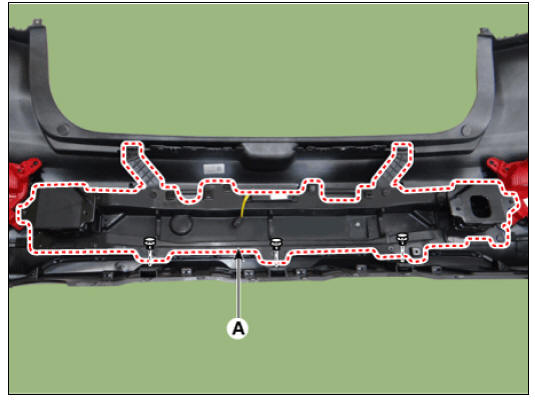
- After loosening the mounting clips, remove the rear bumper beam assembly (A).
- To install, reverse the removal procedure.
Warning
- Replace any damaged clips (or pin-type retainers).
- Make sure the connector are connected in properly.
READ NEXT:
 Rear Door / Repair Procedures
Rear door trim
Rear door delta inner cover
Rear door panel & module
Rear door delta lower run & channel
Rear door side weatherstrip
Rear door body side weatherstrip
Rear door window glass run
Rear door delta moulding
Rear
Rear Door Trim
Rear Door Trim Components and components location
Rear door trim
Rear Door Trim Repair procedures
Replacement
Remove the rear door delta inner cover (A) using a remover.
Remove the rear door inside cap (A) and then loosen th
SEE MORE:
Intelligent Speed Limit Assist settings
Speed limit
A: Driver Assistance
Speed Limit
Speed Limit Assist
Speed Limit Warning
Off
With the vehicle on, touch Settings →
Driver Assistance → Speed Limit on
the instrument cluster or Settings →
Vehicle → Driver As
Rear Axle Assembly / Rear Hub - Carrier
Components
Disc
Dust cover
Rear hub
Rear Knuckle
Rear Hub - Carrier / Repair Procedures
Removal
Remove the tire (A).
Tightening torque :
107.9 - 127.5 N*m (11.0 - 13.0 kgf*m, 79.6 - 94.0 lb*ft)
Warning
Be careful not t
Categories
- Home
- KIA Niro EV, Hybrid - Second generation - (SG2) (2021-2024) - Owner's manual
- Kia Niro - First generation - (DE) (2017-2022) - Service and Repair Manual
- Contact Us