KIA Niro: Ambient Temperature Sensor | Auto Defogging Sensor
Description
Located at the front of the condenser, the ambient temperature sensor detects the ambient air temperature. It is a negative type thermistor; resistance will increase at lower temperature and decrease at higher temperature.
The sensor output is used to control discharged air temperature, calibrate the sensor, control temperature control door, control the blower motor level, control the mix mode and control the in-car humidity.
Warning
If the ambient temperature is below 2.0ºC (35.6ºF), the A/C compressor will stop.
The compressor will operate manually.
Ambient Temperature Sensor Repair procedures
Inspection
- Check the resistance of the ambient temperature sensor between terminals 1 and 2 whether it changes by changing the ambient temperature.
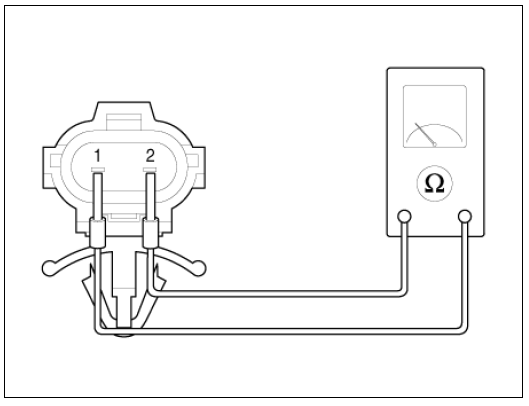
- Ambient sensor (+)
- Sensor ground
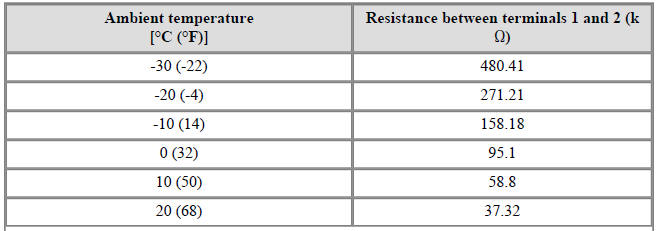
Specification

Replacement
- Disconnect the negative (-) battery terminal.
- Remove the front bumper assembly.
(Refer to Body - "Front Bumper Cover Assembly")
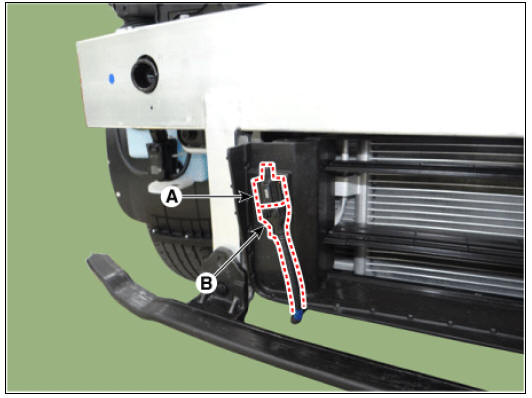
- Disconnect the connector (A) and remove the ambient temperature sensor (B).
- Install in the reverse order of removal.
Auto Defogging Sensor
Description
Installed on the windshield glass, the auto defogging sensor detects humidity to blow out wind for defogging to improve visibility and driver comfort. The air conditioner control module receives signal from the sensor and restrains moisture and eliminate defog by controlling the intake actuator, A/C, auto defogging actuator, blower motor rpm, and mode actuator.
Auto Defogging Sensor Repair procedures
Replacement
- Disconnect the negative (-) battery terminal.
- Remove the auto defogging sensor cover (A).
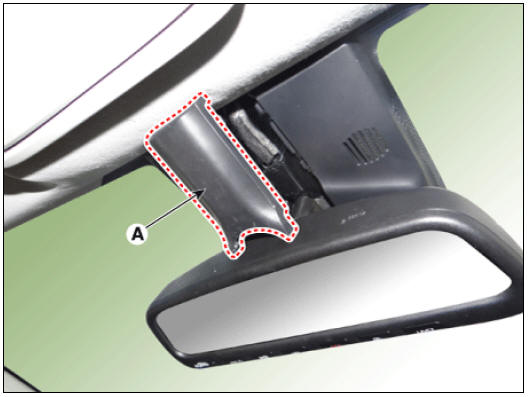
- Using a screwdriver or a remover, remove the LDWS & rain sensor cover (A).
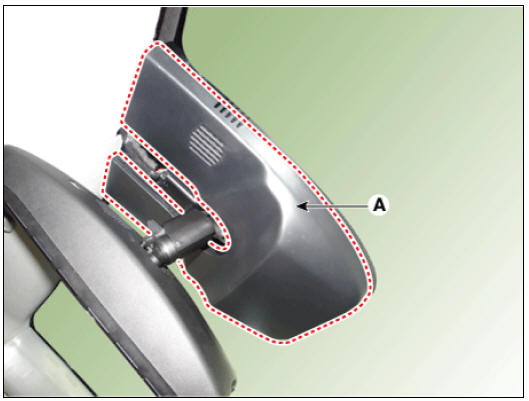
- Remove the auto defogging sensor connector (B) and the auto defogging sensor (A).

- Install in the reverse order of removal.
READ NEXT:
 Duct Sensor Repair procedures
Inspection
Check that the voltage between No. 1 and 2 duct sensors change.
Sensor (+ 5V)
Sensor ground
Specification
Replacement
Duct sensor - Floor
Disconnect the negative (-) battery terminal.
Remove the crash pad low
SEE MORE:
Forward Collision-Avoidance Assist malfunction and limitations
(Kia Niro Hybrid only)
A: Check forward safety systems
When Forward Collision-Avoidance
Assist is not working properly, the warning
message will appear, and the ( )
and ( ) warning lights will appear
on
the cluster. Kia recommends visitin
Seat Belt System
Pretensioner (BPT) / Description And Operation
The Seat Belt Pretensioners (BPT) are installed inside Center Pillar (LH &
RH). When a vehicle
crashes with a certain degree of frontal impact, the pretensioner seat belt
helps to reduce the se
Categories
- Home
- KIA Niro EV, Hybrid - Second generation - (SG2) (2021-2024) - Owner's manual
- Kia Niro - First generation - (DE) (2017-2022) - Service and Repair Manual
- Contact Us