KIA Niro: Duct Sensor Repair procedures
Kia Niro - First generation - (DE) (2017-2022) - Service and Repair Manual / Heating, Ventilation and Air Conditioning / Air Conditioning System / Duct Sensor Repair procedures
Inspection
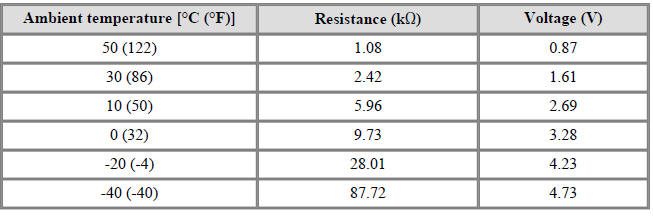
- Check that the voltage between No. 1 and 2 duct sensors change.
- Sensor (+ 5V)
- Sensor ground
Specification
Replacement
Duct sensor - Floor
- Disconnect the negative (-) battery terminal.
- Remove the crash pad lower panel.
(Refer to Body - "Crash Pad Lower Panel")
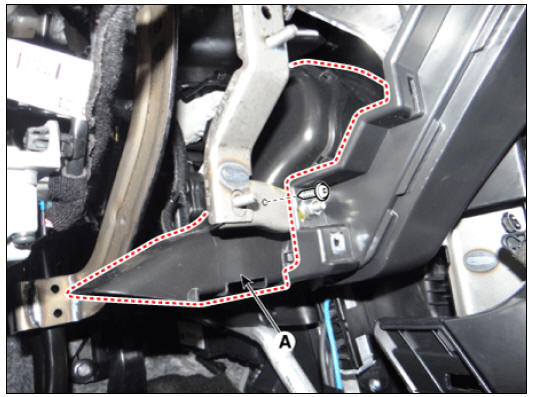
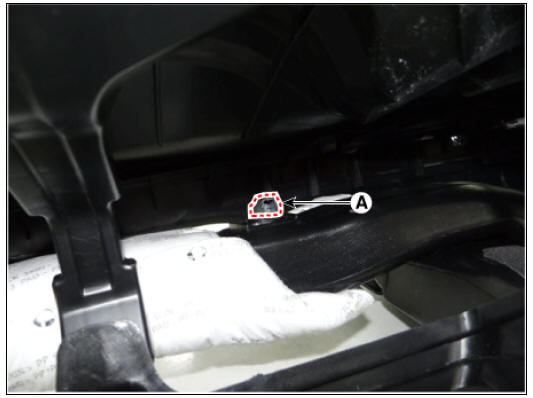
- Loosen the mounting screw and remove the cockpit shower duct (A).
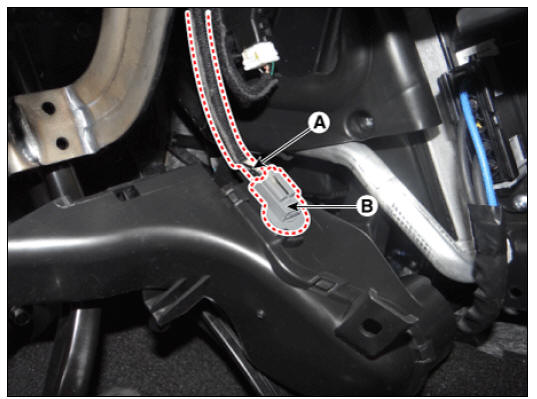
- Remove the connector (A). Then, turn the duct sensor (B) by 90º in the counterclockwise direction to remove it.
- Install in the reverse order of removal
Duct sensor - Vent
- Disconnect the negative (-) battery terminal.
- Remove the instrument cluster.
(Refer to Body Electrical System - "Instrument Cluster")
- Remove the duct sensor (A) by pulling it out after rotating it 90º in a counterclockwise direction.
- Install in the reverse order of removal.
READ NEXT:
 Blower Unit
Blower Unit Components and components location
Blower unit assembly
Components
Blower Intake Seal
Intake Duct Case (Upper)
Intake Door Assembly
Intake Duct Case (Lower)
Air Filter Cover
Intake Actuator
Air Filter
Anti
Blower Motor Repair procedures | Climate Control Air Filter Repair procedures
Inspection
Operate the heater controls at IGN2 to ensure that the motor is running.
Battery (+)
Input signal
Ë—
Ground
If the blower motor does not operate well, substitute with a known-good blower m
SEE MORE:
Suspension System
Service
Data
Front Suspension
Rear Suspension
Wheel & Tire
Wheel Alignment
Tightening
Torques
Front Suspension
Rear Suspension
Special Service Tools
Tool Name / Number / IIIustration
/ Description
Heater
Heater Unit Components and components location
Heater unit assembly
Components
LH
Heater Core Cover
Heater Core Assembly
PTC Heater
Duct Sensor
Shower Duct (LH)
Evaporator lower case insulation
Heater Lower Case
Drain
Categories
- Home
- KIA Niro EV, Hybrid - Second generation - (SG2) (2021-2024) - Owner's manual
- Kia Niro - First generation - (DE) (2017-2022) - Service and Repair Manual
- Contact Us