KIA Niro: Condenser
Condenser Components and components location
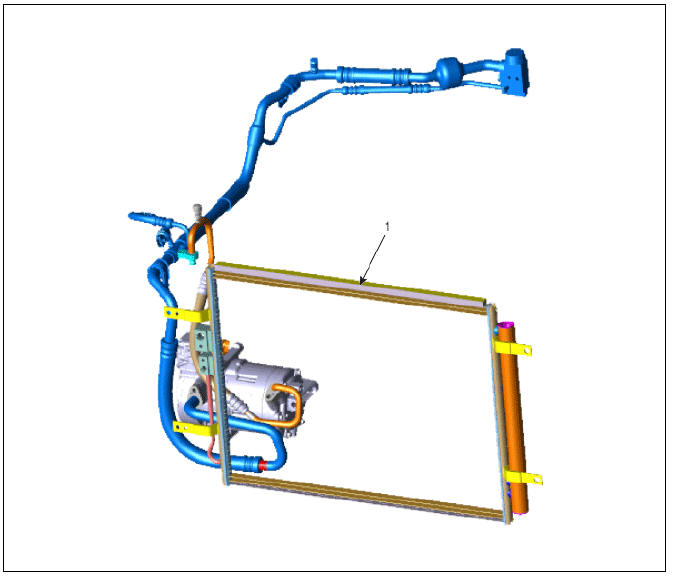
- Condenser
Condenser Repair procedures
Inspection
- Check the condenser fins for clogging and damage. Clean and blow compressed air on any clogged fins. Unfold any bent fins with a screwdriver or pliers.
- Check the condenser connections for leakage, and repair or replace it, if required.
Replacement
Recover the refrigerant with a recovery / recycling / charging station.
Warning
If PAG oil mixes into the POE oil of the system, dielectric breakdown may occur due to decreased volumetric resistivity and the A/C compressor may not work.
- Disconnect the negative (-) battery terminal.
- Remove the front bumper beam assembly.
(Refer to Body - "Front Bumper Beam Assembly")
- Remove the active air flap.
(Refer to Engine Mechanical System - "Active Air Flap (AAF)")
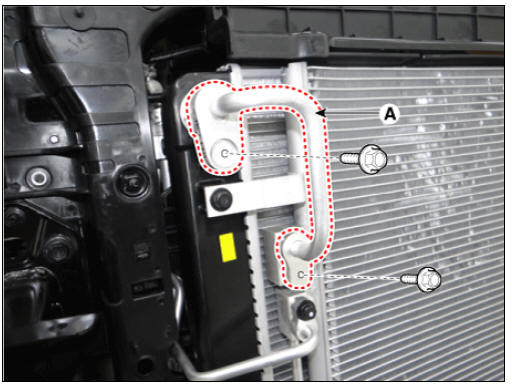
- Loosen the bolt and remove the coolant hose (A).
Tightening torque : 7.8 - 11.7 N*m (0.8 - 1.2 kgf*m, 5.7 - 8.6 lb*ft)
Warning
Plug or cap the lines immediately after disconnecting them to avoid moisture and dust contamination.
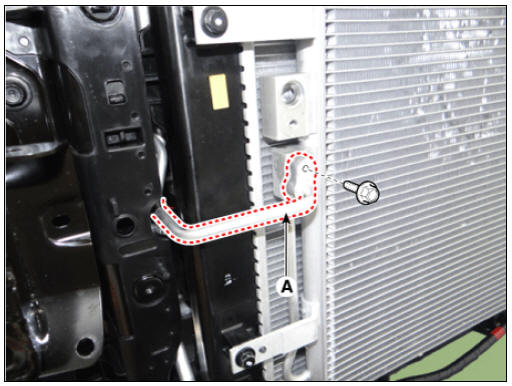
- Loosen the bolts and then separate the liquid line (A).
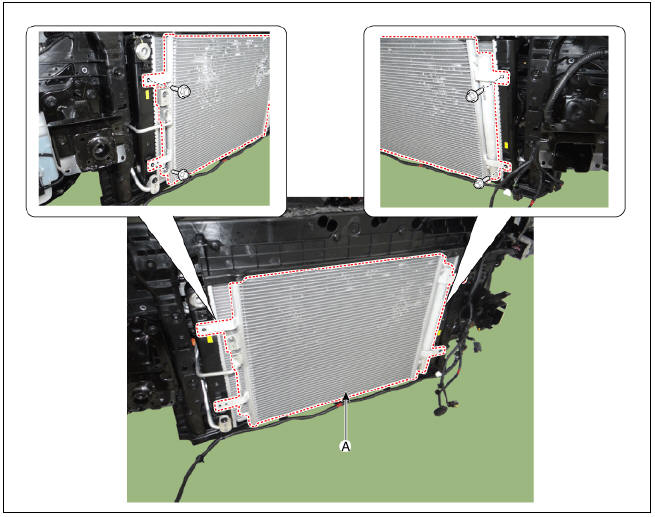
- Loosen the mounting bolts and remove the condenser (A).
- Install in the reverse order of removal.
Warning
- When installing a new condenser, add refrigerant oil (POE OIL).
- Replace the O-rings with new ones at each fitting, and apply a thin coat of refrigerant oil before installing them. Be sure to use the right O-rings for R-134a, R-1234yf to avoid leakage.
- Be careful not to damage the radiator and condenser fins when installing the condenser.
- Charge the system, and test its performance.
Warning
If PAG oil mixes into the POE oil of the system, dielectric breakdown may occur due to decreased volumetric resistivity and the A/C compressor may not work.
Receiver-Drier Repair procedures
Replacement
- Remove the condenser.
- Remove the cap (B) on the bottom of the condenser with an L wrench (A).
Tightening torque : 9.81 - 14.71 N*m (1.0 - 1.5 kgf*m, 7.2 - 10.8 lb*ft)
- Remove the receiver-drier (A) from condenser using long nose pliers. Check for crumbled receiver-drier and clogged bottom cap filter.
- Apply air conditioning compressor oil along the O-rings and threads of the new bottom cap.
- Insert a new receiver-drier into the receiver drier tank. The receiver-drier must be sealed in vacuum before it is exposed to air for use.
- Install a new bottom cap to the condenser.
Warning
- Always replace the receiver-drier and bottom cap at the same time.
- Replace the O-rings with new ones at each fitting, and apply a thin coat of refrigerant oil before installing them. Be sure to use the right O-rings for R-134a, R-1234yf to avoid leakage.
- Be careful not to damage the radiator and condenser fins when installing the condenser.
- Charge the system, and test its performance.
READ NEXT:
 A/C Pressure Transducer
A/C Pressure Transducer Components and components location
A/C Pressure Transducer
Description
A/C pressure transducer measures the pressure in high pressure line and
converts it into voltage. Based
on the converted voltage, engine ECU
Evaporator Core Repair procedures, Evaporator Temperature Sensor
Replacement
Disconnect the negative (-) battery terminal.
Remove the heater and blower assembly.
(Refer to Heater - "Heater Unit")
Remove the heater unit lower case (A) after loosening the mounting screws.
SEE MORE:
Remote Operation function operation status
NOTICE
Operation status by the hazard warning
light may not be applicable based
on the regulation of your country.
If the smart key is not within the operating
range from the vehicle (approximately
4m (13 ft.)), the smart key LED
Lighting System
Lighting System / Components And Components Location
Specifications
Lighting System / Components And Components Location
Headlamp (Low/High BI-Function)
Turn signal lamp
Sub low beam
Daytime running light, Position lamp
Fog
Categories
- Home
- KIA Niro EV, Hybrid - Second generation - (SG2) (2021-2024) - Owner's manual
- Kia Niro - First generation - (DE) (2017-2022) - Service and Repair Manual
- Contact Us