KIA Niro: Replacing headlamp (Low beam/High beam) (Bulb type)
KIA Niro EV, Hybrid - Second generation - (SG2) (2021-2024) - Owner's manual / Maintenance / Lamps / Replacing headlamp (Low beam/High beam) (Bulb type)
Operation
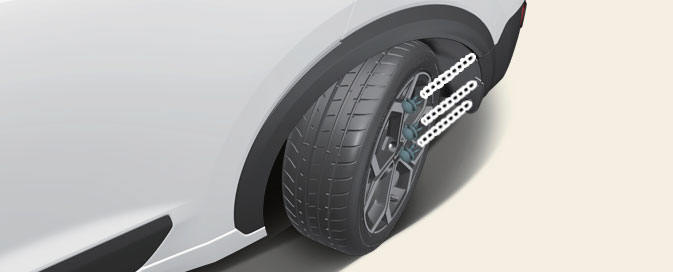
- Before turning off the vehicle, operate the steering wheel in the opposite direction of the lamp to be replaced to steer the tires toward the inside of the vehicle body.
- When replacing the right headlamp: operate to the left
- When replacing the left headlamp: operate to the right
- Turn off vehicle and disconnect the negative terminal from the battery.
- Remove the wheel guard fasteners using a tool and then remove the wheel guard.
- Remove the socket from the assembly (1) by turning the socket counterclockwise until the tabs on the socket align with the slots on the assembly
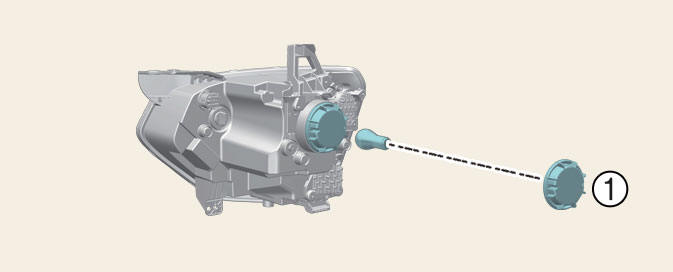
- Remove the bulb from the socket by pressing it in and rotating it counterclockwise until the tabs on the bulb align with the slots in the socket. Pull the bulb out of the socket.
- Insert a new bulb by inserting it into the socket and rotating it until it locks into place
- Install the socket in the assembly by aligning the tabs on the socket with the slots in the assembly. Push the socket into the assembly and turn the socket clockwise
- Connect the negative terminal from the battery.
Replacing front turn signal lamp (Bulb type)
Operation
- Disconnect the negative terminal from the battery.
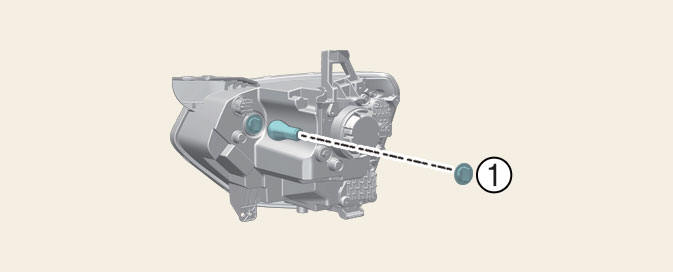
- Remove the socket from the assembly (1) by turning the socket counterclockwise until the tabs on the socket align with the slots on the assembly.
- Remove the bulb from the socket by pressing it in and rotating it counterclockwise until the tabs on the bulb align with the slots in the socket. Pull the bulb out of the socket.
- Insert a new bulb by inserting it into the socket and rotating it until it locks into place.
- Install the socket in the assembly by aligning the tabs on the socket with the slots in the assembly. Push the socket into the assembly and turn the socket clockwise.
- Connect the negative terminal from the battery.
Replacing rear turn signal lamp, backup lamp (Bulb type)
If the rear turn signal lamp or backup lamp does not operate, have your vehicle checked by a professional workshop.
Kia recommends to visit an authorized Kia dealer/service partner.
A skilled technician should check or repair the lamps, for it may damage related parts of the vehicle.
Replacing rear turn signal lamp, backup lamp (Bulb type) (Kia NIRO Hybrid)
Operation
- Open the tailgate.
- Open the service cover.
- Loosen the light assembly retaining screws with a cross-tip screw driver.
- Remove the rear combination lamp assembly from the body of the vehicle.
- Disconnect the rear combination lamp connector.
- Remove the socket from the assembly by turning the socket counterclockwise until the tabs on the socket align with the slots on the assembly.
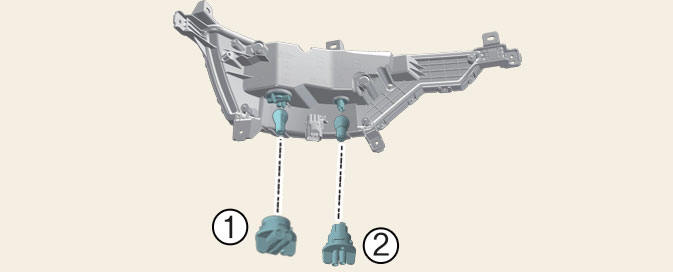
1) Rear turn signal lamp bulb
2) Backup lamp
- Remove the bulb from the socket by pressing it in and rotating it counterclockwise until the tabs on the bulb align with the slots in the socket. Pull the bulb out of the socket.
- Insert a new bulb by inserting it into the socket and rotating it until it locks into place.
- Install the socket in the assembly by aligning the tabs on the socket with the slots in the assembly. Push the socket into the assembly and turn the socket clockwise.
- Install the rear combination lamp assembly to the body of the vehicle.
- Install the service cover.
Replacing side repeater lamp (Bulb type)
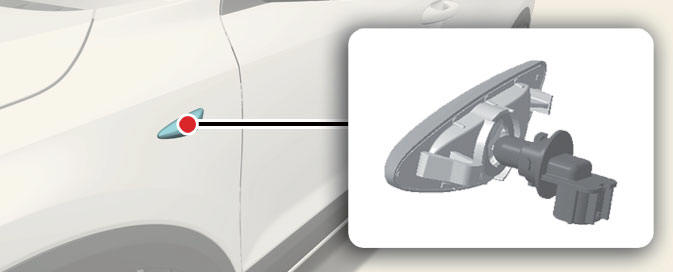
Operation
- Turn off vehicle and disconnect the negative terminal from the battery.
- Using a screwdriver, gently pry the lamp assembly
- Separate the socket and the lens parts by turning the socket counterclockwise until the tabs on the socket align with the slots on the lens part.
- Remove the bulb by pulling it straight out.
- Install a new bulb in the socket.
- Install the lamp assembly.
CAUTION
Be careful not to dirty or damage the lens, lens tab, and plastic housings.
READ NEXT:
 Replacing license plate lamp (Bulb
type)
Replacing license plate lamp (Bulb
type)
Operation
Turn off vehicle and disconnect the
negative terminal from the battery.
Using a screwdriver, gently pry the
lamp assembly.
Remove the bulb by pulling it straight
out.
Install a new bulb in the socket.
Install the lamp
Replacing glove box lamp (Bulb type)
Operation
Using a flat-blade screwdriver, gently
pry the lamp assembly from interior.
Remove the cover from the lamp
assembly.
Remove the bulb by pulling it straight
out.
Install a new bulb in the socket.
Install the cover
Headlamp and front fog lamp aiming (for Europe)
Headlamp aiming
Type A
Type B
Operation
Inflate the tires to the specified pressure
and remove any loads from the
vehicle except the driver, spare tire,
and tools.
The vehicle should be placed on a flat
floor.
Draw vertical lin
SEE MORE:
Water pump Repair procedures
Removal
Warning
Be sure to read and follow the "General Safety Information and
Caution" before doing any work related
with the high voltage system. Failure to follow the safety instructions may
result in serious electrical
injuries.
Warning and indicator lights (related to electric vehicle)
Ready indicator READY
This indicator appears:
When the vehicle is ready to be
driven.
ON: Normal driving is possible.
OFF: Normal driving is not possible,
or a problem has occurred.
Blinking: Emergency driving.
When
Categories
- Home
- KIA Niro EV, Hybrid - Second generation - (SG2) (2021-2024) - Owner's manual
- Kia Niro - First generation - (DE) (2017-2022) - Service and Repair Manual
- Contact Us