KIA Niro: Replacing license plate lamp (Bulb type)
KIA Niro EV, Hybrid - Second generation - (SG2) (2021-2024) - Owner's manual / Maintenance / Lamps / Replacing license plate lamp (Bulb
type)
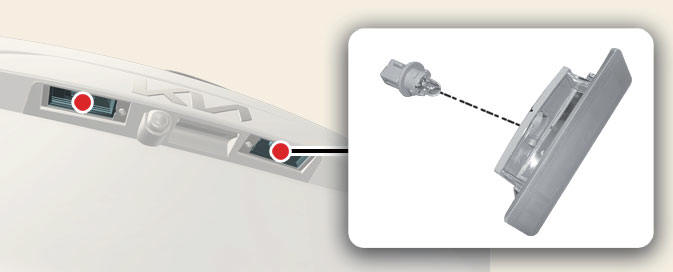
Operation
- Turn off vehicle and disconnect the negative terminal from the battery.
- Using a screwdriver, gently pry the lamp assembly.
- Remove the bulb by pulling it straight out.
- Install a new bulb in the socket.
- Install the lamp assembly.
CAUTION
Be careful not to dirty or damage the lens, lens tab, and plastic housings.
Replacing map lamp (Bulb type)
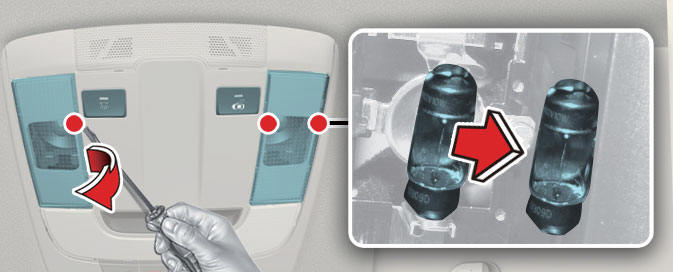
Operation
- Using a flat-blade screwdriver, gently pry the lens cover from lamp housing.
- Remove the bulb by pulling it straight out.
- Install a new bulb in the socket.
- Align the lens cover tabs with the lamp housing notches and snap the lens into place.
WARNING
Prior to working on the Interior lamps, ensure that the "OFF" button is depressed to avoid burning your fingers or receiving an electric shock.
Replacing room lamp (Bulb type)
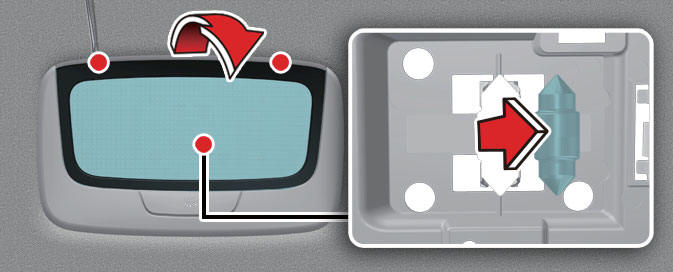
Operation
- Using a flat-blade screwdriver, gently pry the lens cover from lamp housing.
- Remove the bulb by pulling it straight out.
- Install a new bulb in the socket.
- Align the lens cover tabs with the lamp housing notches and snap the lens into place.
WARNING
Prior to working on the Interior lamps, ensure that the "OFF" button is depressed to avoid burning your fingers or receiving an electric shock.
Replacing vanity mirror lamp (Bulb type)
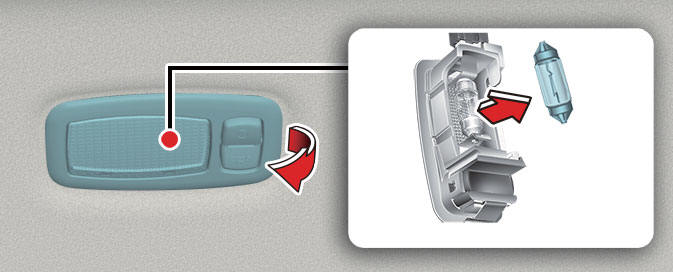
Operation
- Using a flat-blade screwdriver, gently pry the lens cover from lamp housing.
- Remove the bulb by pulling it straight out.
- Install a new bulb in the socket.
- Align the lens cover tabs with the lamp housing notches and snap the lens into place.
WARNING
Prior to working on the Interior lamps, ensure that the "OFF" button is depressed to avoid burning your fingers or receiving an electric shock.
READ NEXT:
 Replacing glove box lamp (Bulb type)
Operation
Using a flat-blade screwdriver, gently
pry the lamp assembly from interior.
Remove the cover from the lamp
assembly.
Remove the bulb by pulling it straight
out.
Install a new bulb in the socket.
Install the cover
Headlamp and front fog lamp aiming (for Europe)
Headlamp aiming
Type A
Type B
Operation
Inflate the tires to the specified pressure
and remove any loads from the
vehicle except the driver, spare tire,
and tools.
The vehicle should be placed on a flat
floor.
Draw vertical lin
SEE MORE:
Radiator Grille
Radiator Grille
Replacement
Remove the front bumper assembly.
(Refer to Front Bumper - "Front Bumper Assembly")
Remove the front bumper wiring (A).
Remove the front bumper energy absorber (A).
After loo
Washers (Kia NIRO Hybrid)
Controlling washers
Type A
Type B
Type C
Operation
Move the wiper speed control switch
to /
position.
Pull/push the lever to spray washer
fluid on the windshield.
The wipers run several times.
WARNING
Do not use the washe
Categories
- Home
- KIA Niro EV, Hybrid - Second generation - (SG2) (2021-2024) - Owner's manual
- Kia Niro - First generation - (DE) (2017-2022) - Service and Repair Manual
- Contact Us