KIA Niro: Vehicle to load (V2L)
KIA Niro EV, Hybrid - Second generation - (SG2) (2021-2024) - Owner's manual / Electric vehicle guide (Kia Niro EV) / EV menu / Vehicle to load (V2L)
V2L is the system that provides AC power using the high voltage battery for driving to operate several electronical products.
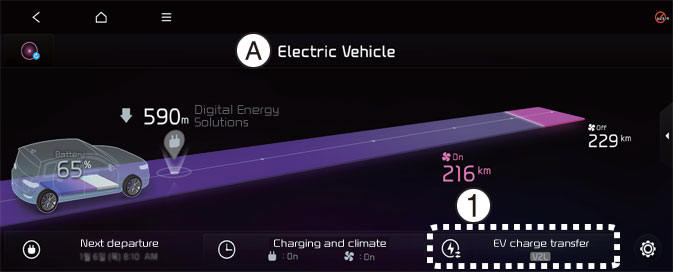
A: Electric Vehicle
- EV Charge Transfer
Select EV → EV Charge Transfer on the screen.
You can set the battery discharging limit for high voltage battery for driving.
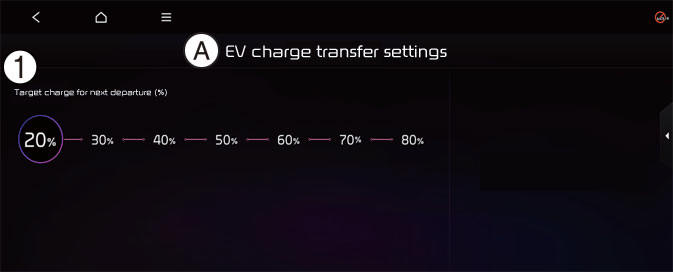
A: EV charge transfer settings
- Target charge for next departure (%)
If the vehicle reaches to the limit, it automatically cut supply of electricity.
NOTICE
The infotainment system may change after software updates. For more information, refer to the manual provided in the infotainment system and the quick reference guide.
Energy information
Select EV and see the vehicle image from the infotainment system screen.
You can check battery discharging level.
READ NEXT:
 How to connect
Outdoor (if equipped)
Open the cover of the V2L connector.
Close the cover after connecting
home appliances and electronic products
to the power outlet.
Connect the V2L connector to the
charging hole on the vehicle.
Pr
LCD display messages
V2L finished. Defined charge level reached
A: V2L finished. Defined charge level
reached
When the high voltage battery level
reaches the discharging limit set level,
the V2L will stop and the warning will be
displayed. If you want to use th
Nearby stations
A: Electric Vehicle
Select EV and see the map from the
infotainment system screen. Stations
around the current location are
searched.
A: Electric Vehicle
Select the icon on the screen.
Around the course, around the current
site, aro
SEE MORE:
Front Radar Unit
Specification
Circuit Diagram
Front Radar Unit Repair Procedures
Inspection
Warning
Put the vehicle on the level ground.
Take out heavy luggage from the vehicles' seats or tailgate.
Set all tires according to the specified pressur
Tires and wheels
Tire care
For proper maintenance, safety, and
maximum fuel economy, you must
always maintain recommended tire
inflation pressures and stay within the
load limits and weight distribution recommended
for your vehicle.
Recommended cold tire infla
Categories
- Home
- KIA Niro EV, Hybrid - Second generation - (SG2) (2021-2024) - Owner's manual
- Kia Niro - First generation - (DE) (2017-2022) - Service and Repair Manual
- Contact Us