KIA Niro: Engine Mechanical System / Troubleshooting
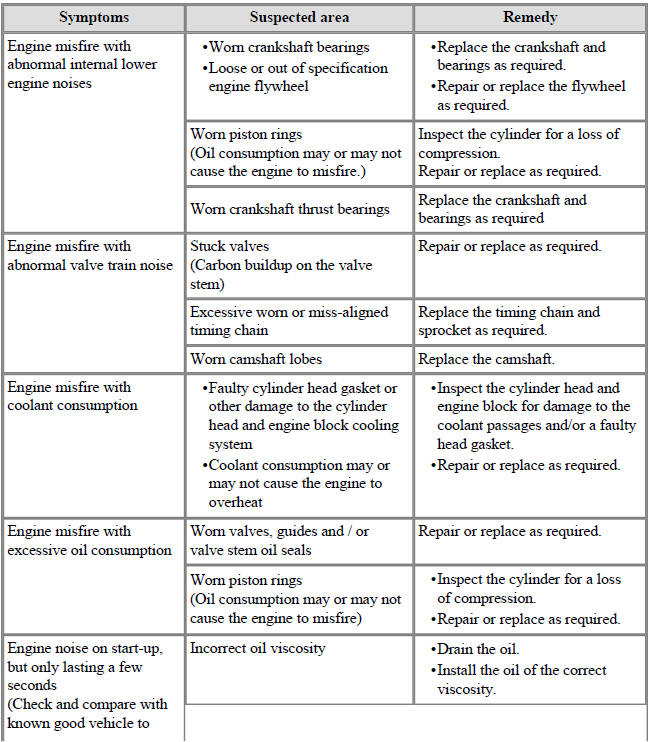

Symptoms :
Engine misfire with abnormal internal lower engine noises
Suspected area → Remedy
-
Worn crankshaft bearings → Replace the crankshaft and bearings as required.
-
Loose or out of specification engine flywheel → Repair or replace the flywheel
as required.
Worn piston rings
(Oil consumption may or may not cause the engine to misfire.) → Inspect the cylinder for a loss of
compression.
Repair or replace as required.
Worn crankshaft thrust bearings→ Replace the crankshaft and
bearings as required
Symptoms :
Engine misfire with abnormal valve train noise
Suspected area → Remedy
Stuck valves
(Carbon buildup on the valve stem) → Repair or replace as required.
Excessive worn or miss-aligned timing chain → Replace the timing chain and sprocket as required.
Worn camshaft lobes →Replace the camshaft.
Symptoms :
Engine misfire with coolant consumption
Suspected area → Remedy
-
Faulty cylinder head gasket or other damage to the cylinder head and engine block cooling system → Inspect the cylinder head and engine block for damage to the coolant passages and/or a faulty head gasket.
-
Coolant consumption may or may not cause the engine to overheat → Repair or replace as required.
Symptoms :
Engine misfire with excessive oil consumption
Suspected area → Remedy
Worn valves, guides and / or valve stem oil seals → Repair or replace as required.
Worn piston rings
(Oil consumption may or may not cause the engine to misfire) →
-
Inspect the cylinder for a loss
of compression. -
Repair or replace as required.
Symptoms :
Engine noise on start-up, but only lasting a few
seconds
(Check and compare with
known good vehicle to determine normal condition.)
Suspected area → Remedy
Incorrect oil viscosity →
-
Drain the oil.
-
Install the oil of the correct viscosity.
Worn crankshaft thrust bearing →
-
Inspect the thrust bearing and crankshaft.
-
Repair or replace as required.
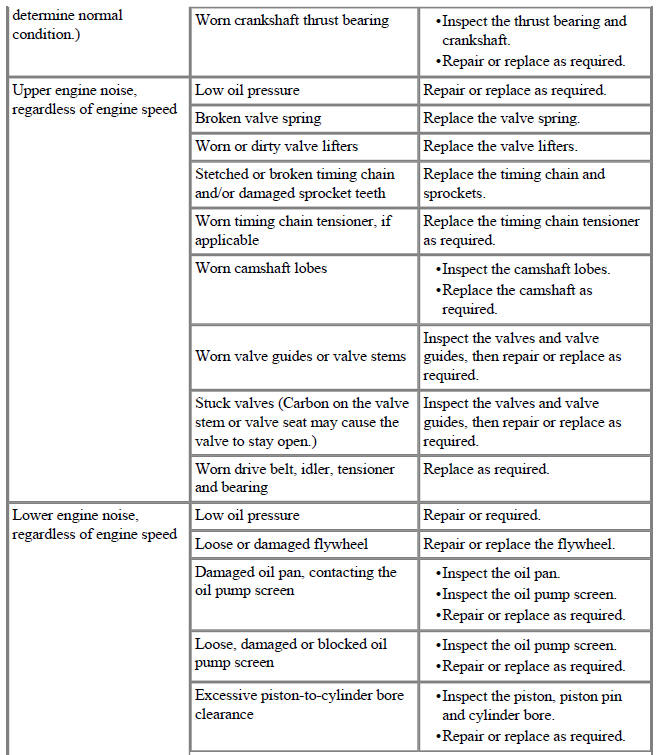
Symptoms :
Upper engine noise, regardless of engine speed
Suspected area → Remedy
Low oil pressure →
Repair or replace as required.
Broken valve spring → Replace the valve spring.
Worn or dirty valve lifters → Replace the valve lifters.
Stetched or broken timing chain and/or damaged sprocket teeth → Replace the timing chain and
sprockets.
Worn timing chain tensioner, if applicable →Replace the timing chain tensioner as required.
Worn camshaft lobes →
-
Inspect the camshaft lobes.
-
Replace the camshaft as required.
Worn valve guides or valve stems → Inspect the valves and valve
guides, then repair or replace as required.
Stuck valves (Carbon on the valve stem or valve seat may cause the valve to stay open.) → Inspect the valves and valve
guides, then repair or replace as required.
Worn drive belt, idler, tensioner and bearing → Replace as required.
Symptoms :
Lower engine noise, regardless of engine speed
Suspected area → Remedy
Low oil pressure → Repair or required.
Loose or damaged flywheel → Repair or replace the flywheel.
Damaged oil pan, contacting the oil pump screen →
-
Inspect the oil pan.
-
Inspect the oil pump screen.
-
Repair or replace as required.
Loose, damaged or blocked oil pump screen →
-
Inspect the oil pump screen.
-
Repair or replace as required.
Excessive piston-to-cylinder bore clearance →
-
Inspect the piston, piston pin and cylinder bore.
-
Repair or replace as required.
Excessive piston pin-to-piston clearance →
-
Inspect the piston, piston pin and the connecting rod.
-
Repair or replace as required.
Excessive connecting rod bearing clearance →
Inspect the following components
and repair or replace as required.
-
The connecting rod bearings.
-
The connecting rods.
-
The crankshaft pin journals.
Excessive crankshaft bearing clearance → Inspect the following components, and repair or replace as required.
-
The crankshaft bearings.
-
The crankshaft main journals.
-
The cylinder block
Incorrect piston, piston pin and connecting rod installation →
-
Verify the piston pins and connecting rods are installed correctly.
-
Repair as required.
Symptoms :
Engine noise under load
Suspected area → Remedy
Low oil pressure → Repair or replace as required.
Excessive connecting rod bearing clearance → Inspect the following components and repair or replace as required:
-
The connecting rod bearings
-
The connecting rods
-
The crankshaft
Excessive crankshaft bearing clearance → Inspect the following components, and repair or replace as required:
-
The crankshaft bearings
-
The crankshaft main journals
-
The cylinder block
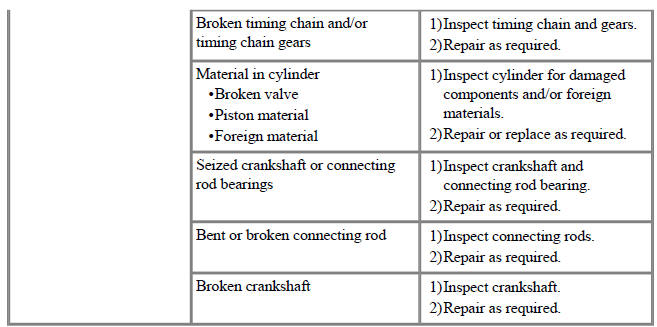
Symptoms :
Engine will not crank.
Crankshaft will not rotate.
Suspected area → Remedy
Hydraulically locked cylinder
-
Coolant/antifreeze in cylinder
-
Oil in cylinder
-
Fuel in cylinder → 1) Remove spark plugs and check
for fluid.2) Inspect for broken head gasket.
3) Inspect for cracked engine block or cylinder head.
4) Inspect for a sticking fuel injector and/or leaking fuel regulator.
Broken timing chain and/or timing chain gears →1) Inspect timing chain and gears.
2) Repair as required.
Material in cylinder
-
Broken valve
-
Piston material
-
Foreign material → 1) Inspect cylinder for damaged components and/or foreign materials.
2) Repair or replace as required.
Seized crankshaft or connecting rod bearings →1) Inspect crankshaft and connecting rod bearing.
2) Repair as required.
Bent or broken connecting rod → 1) Inspect connecting rods.
2) Repair as required.
Broken crankshaft → 1) Inspect crankshaft.
2) Repair as required.
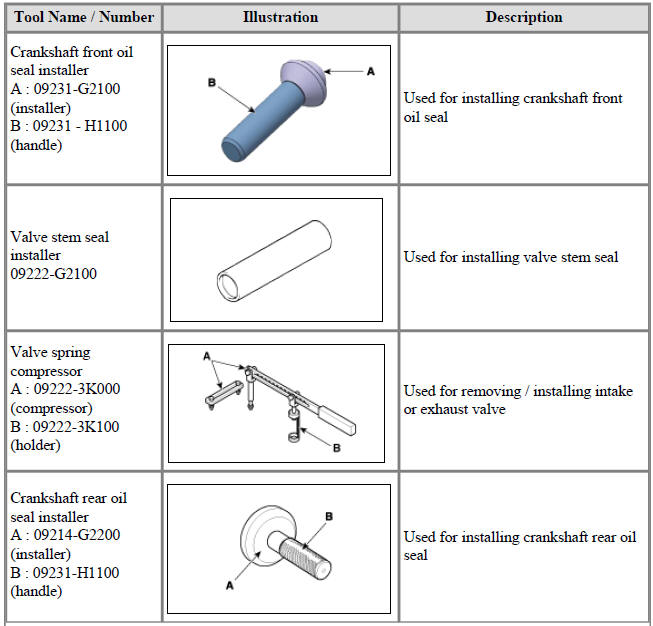
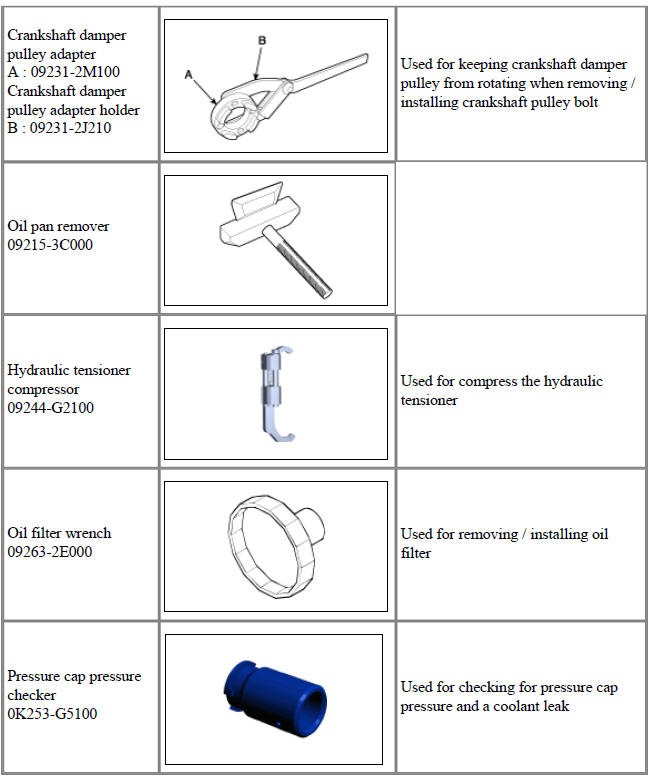
Special Service Tools
READ NEXT:
 Cooling System
Components
Reservoir tank
Reservoir hose & pipe
Radiator
Radiator upper hose
Radiator lower hose
Radiator upper mounting bracket (RH)
Radiator upper mounting bracket (LH)
Radiator lower mounting insulator (RH)
Radiator low
Coolant Repair procedures
Warning
Never remove the radiator cap when the engine is hot. Serious
scalding could be caused by hot fluid under
high pressure escaping from the radiator.
Warning
When pouring engine coolant, shut the relay box lid and be careful
not to spil
Cooling Fan Repair procedures | Cooling Fan Assembly
Cooling Fan Components and components location
Components
Cooling fan
Cooling fan motor
Cooling fan shroud
Air dam
Cooling fan controller (PWM)
Description
Controls the cooling fan motor voltage depending on the duty
SEE MORE:
Controlling fan speed (Kia NIRO Hybrid)
Operation
Press left or right button to adjust the
speed.
Turning the fan OFF (Kia NIRO Hybrid)
Operation
Press the left knob to turn the blowers
off.
Climate control features (Kia NIRO Hybrid)
Activate upon washer fluid
Timing Chain Repair procedures
Removal
Warning
Be sure to read and follow the "General Safety Information and
Caution" before doing any work related
with the high voltage system. Failure to follow the safety instructions may
result in serious electrical
injuries.
Categories
- Home
- KIA Niro EV, Hybrid - Second generation - (SG2) (2021-2024) - Owner's manual
- Kia Niro - First generation - (DE) (2017-2022) - Service and Repair Manual
- Contact Us