KIA Niro: On vehicle inspection/ Component Inspection
On vehicle inspection
- Accelerate the engine to about 3,000 rpm 3 times or more.
- Remove the spark plug.
- Check the spark plug visually.
If the electrode is dry, the spark plug is normal.
If the electrode is wet, check the damage and electrode gap as below.
Component Inspection
- Check the spark plug for any damage on its thread and insulator.
If there is damage, replace the spark plug.
- Check the electrode. Measure the insulation resistance with an ohmmeter.
If the resistance is less than the specified value, adjust the electrode gap.
Specification: 10 MΩ or more
- Check the spark plug electrode gap.
If the gap is greater than the maximum, replace the spark plug.
Specification: 0.7 - 0.8 mm (0.0276 - 0.0314 in.)
Warning
If adjusting the gap of a new spark plug, bend only the base of the ground electrode. Do not touch the tip.
Never attempt to adjust the gap on a used plug.
Replacement
- Remove the ignition coil.
(Refer to Ignition System - "Ignition Coil")
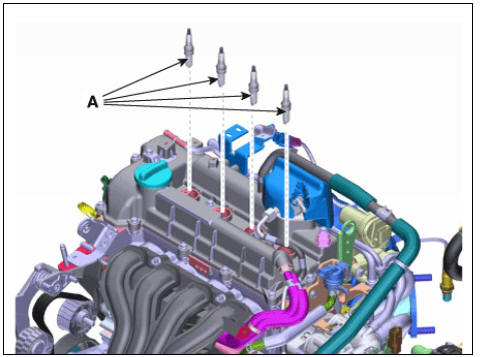
- Using a spark plug wrench, remove the spark plug (A).
spark plug :
19.6 - 24.5 N*m (2.0 - 2.5 kgf*m, 14.5 - 18.0 Ib*ft)
Warning
Be careful that no contaminates enter into spark plug holes.
- Install in the reverse order of removal.
Vapor hose
- Check all the clamps for tightness and the connections for leakage.
- Visually check the vapor lines and hoses for cracks, leaks, loose connections, or deformation.
Fuel filler cap
- Visually check that the fuel tank cap assembly and gasket (A) are not deformed or damaged.
READ NEXT:
 Oil Level Check
Remove the under cover.
(Refer to Engine Mechanical System - "Engine Room Under Cover")
Remove the oil filler plug (A or B).
Check the condition of the oil and make sure that it is at the proper
level (A).
Inst
Front Brake
Inspection
Check the pads for excessive wear, discs for run out and wear, and calipers
for fluid leakage.
Front brake disc thickness check
Check the brake pads for wear and fade.
Check the brake disc for damage and cracks.
Remove all rust
Rear Brake
Rear Brake Disc Thickness Check
Check the brake pads for wear and fade.
Check the brake disc for damage and cracks.
Remove all rust and contamination from the surface, and measure the disc
thickness at 8 points, at least, of
same distanc
SEE MORE:
Fuel Sender Repair procedures
Removal
Remove the fuel pump.
(Refer to Fuel Delivery System - "Fuel Pump")
Disconnect the fuel sender connector (A).
Lift the fixing hook (A) by using a common driver, and then remove the
fuel sender (B).
Steering wheel
Motor Driven Power Steering (MDPS) - (Kia Niro Hybrid only)
Power steering uses the motor to assist
you in steering the vehicle.
If the engine is off or if the power steering
system becomes inoperative, the
vehicle may still be steered, but it
Categories
- Home
- KIA Niro EV, Hybrid - Second generation - (SG2) (2021-2024) - Owner's manual
- Kia Niro - First generation - (DE) (2017-2022) - Service and Repair Manual
- Contact Us