KIA Niro: The Gasoline Particulate Filter (GPF)
Description
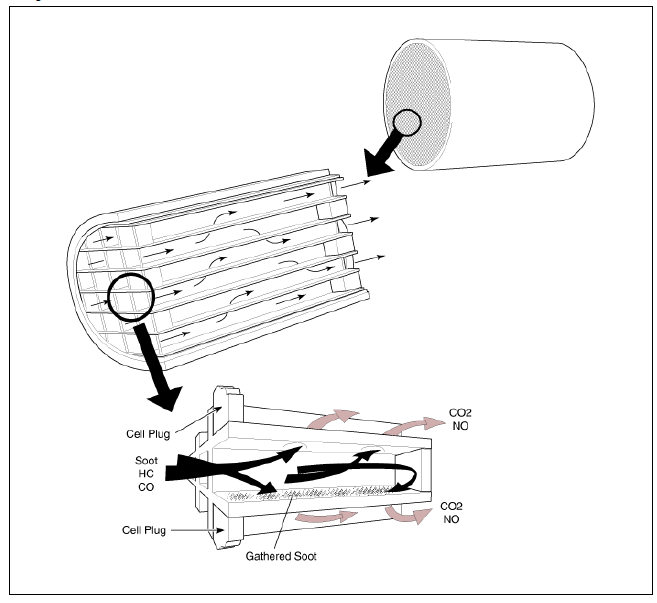
The Gasoline Particulate Filter (GPF) system prevents Particulate Matter (PM) from being discharged to the atmosphere and consists of a filter assembly, two Exhaust Gas Temperature Sensors (EGTS). The filter is integrated in the catalytic converter assembly and has honeycomb cell structure which can filter the PM in the exhaust gas. While the exhaust gas passes the GPF, This gathered PM in GPF is called "soot".
GPF
Regeneration
This procedures is to forcibly regenerate the GPF with scan tool when the GPF doesn't have been regenerated during driving. For example, if the vehicle has repeated "Low speed driving" or "Short distance driving", the GPF regeneration procedure cannot be proceeded because "Regeneration Mode" doesn't made.
Warning
If performing the GPF service regeneration mode indoors, fire or burn injuries may occur by high-temperature exhaust gas.
Therefore the GPF service regeneration mode must be performed in a outdoor safe zone.
Forcibly Regeneration Condition
- Engine coolant temperature: about 70ºC
- Engine at idle
- P-range (A/T) or Neutral (M/T)
- Normal battery voltage
- Electrical fully load ON (A/C ON if equipped, Blower ON with maximum speed, Head Lamp ON, Wiper ON, Other Lamps ON, etc.).
- Turn ignition switch OFF.
- Connect a KDS to Data Link Connector (DLC).
- Turn ignition switch ON.
- Select "Vehicle, Model year, Engine, System".
- Start engine at idle and P-range (A/T) or neutral (M/T).
- Apply electrical fully load to the vehicle (A/C ON, Blower ON with maximum speed, Head Lamp ON, Wiper ON, and Other Lamps ON, etc.).
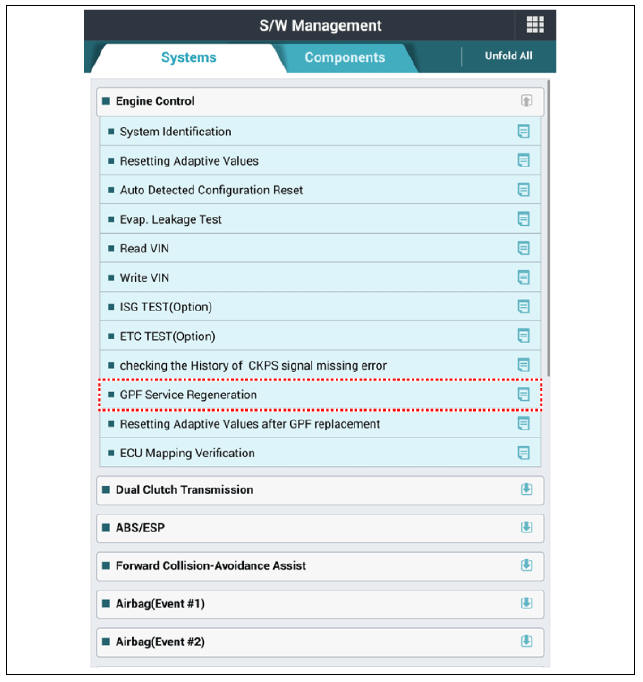
- Select "Vehicle S/W Management".
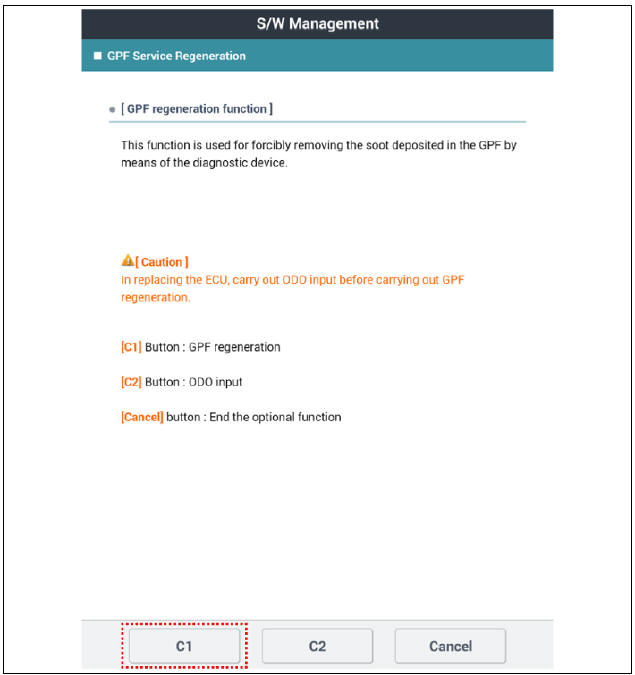
- Select "GPF Service Regeneration".

Removal
- Turn ignition switch OFF and disconnect the battery negative (-) terminal.
- Lift the vehicle.
- Remove the exhaust gas temperature sensor (EGTS) #1,#2.
(Refer to Engine Control / Fuel System - "Exhaust Gas Temperature Sensor (EGTS)")
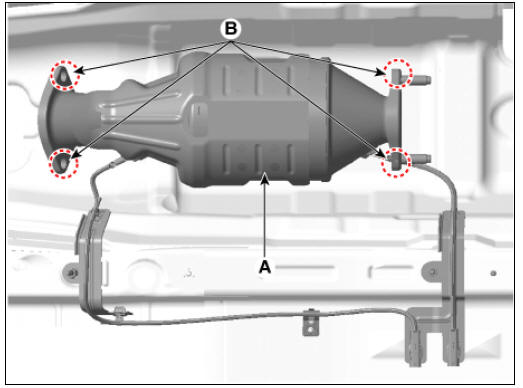
- Remove the GPF (B) after removing the installation nuts (A).
Installation
- Install in the reverse order of removal.
Warning
When installing, replace with new gaskets.
Replacement
Warning
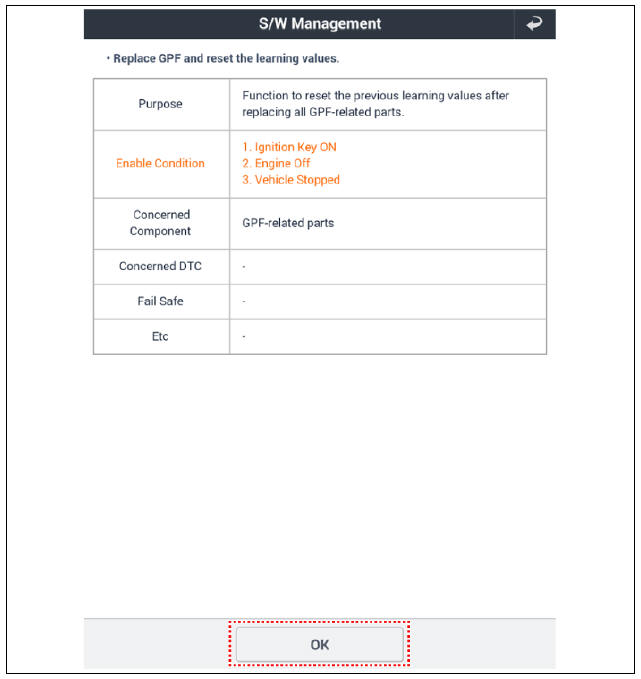
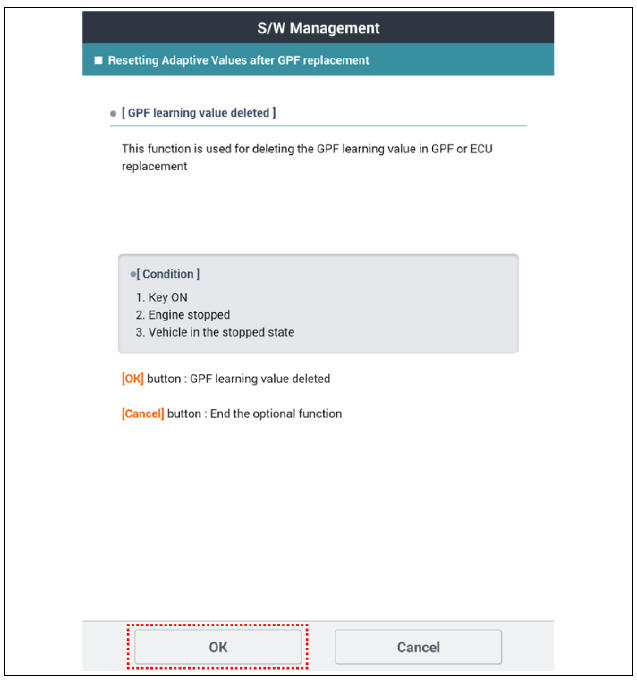
After replacing the GPF assembly, MUST perform the "Component Change Routine" procedure.
- Turn ignition switch OFF.
- Connect a KDS to Data Link Connector (DLC).
- Turn ignition switch ON.
- Select "Vehicle, Model year, Engine, System".
- Start engine at idle and P-range (A/T) or neutral (M/T).
- Apply electrical fully load to the vehicle (A/C ON, Blower ON with maximum speed, Head Lamp ON, Wiper ON, and Other Lamps ON, etc.).
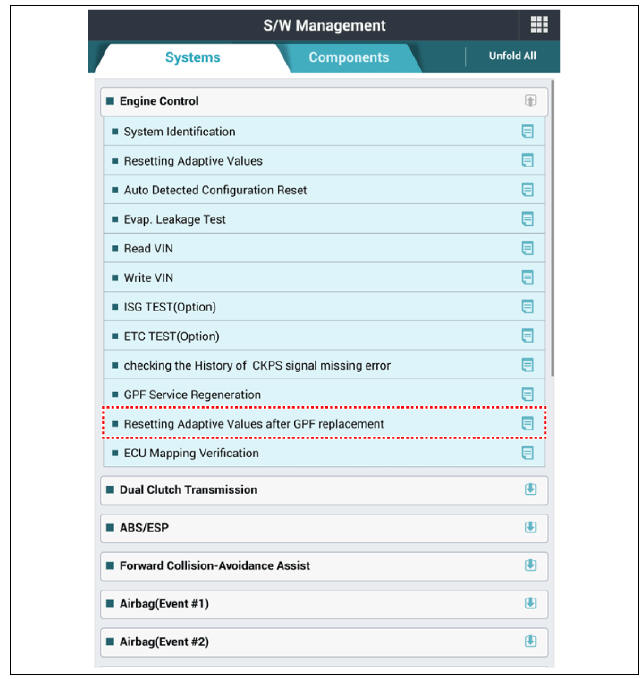
- Select "Vehicle S/W Management".
- Select "Resetting Adaptive Values after GPF replacement".
READ NEXT:
 Engine Control / Fuel System
Specifications
Fuel Delivery System
Sensors
Manifold Absolute Pressure Sensor (MAPS)
Type: Piezo-resistive pressure sensor type
Specification
Intake Air Temperature Sensor (IATS)
Type: Thermistor type
Specification
Basic Troubleshooting
Basic Troubleshooting Guide
Customer Problem Analysis Sheet
Basic Inspection Procedure
Measuring Condition of Electronic Parts' Resistance
The measured resistance at high temperature after vehicle
running may be high or low. So all
Connector Inspection Procedure
Handling of Connector
Never pull on the wiring harness when
disconnecting connectors.
When removing the connector with a latch, press or
pull locking lever.
Listen for a click when locking connectors. This
SEE MORE:
AC inverter
Type A
Type B
The AC inverter supplies 220V/200W or
115V/150W electric power to operate
electric accessories or equipment. If you
wish to use the AC inverter, open up the
AC inverter cover and connect a plug to
it. The AC inverter supplies
Energy flow
The hybrid system informs the drivers its
energy flow in various operating modes.
While driving, the current energy flow is
specified in 11 modes.
Vehicle stop
A: Idle Mode
The vehicle is stopped.
(No energy flow)
EV propulsion
A:
Categories
- Home
- KIA Niro EV, Hybrid - Second generation - (SG2) (2021-2024) - Owner's manual
- Kia Niro - First generation - (DE) (2017-2022) - Service and Repair Manual
- Contact Us