KIA Niro: Coolant Repair procedures
Refilling And Bleeding
Warning
Never remove the cap when the engine is hot. Serious scalding could be caused by hot fluid under high pressure escaping from the reservoir.
Warning
When pouring inverter coolant, be sure to shut the relay box lid to prevent spilling coolant onto electrical parts or painted surfaces. Immediately rinse off any spilt coolant.
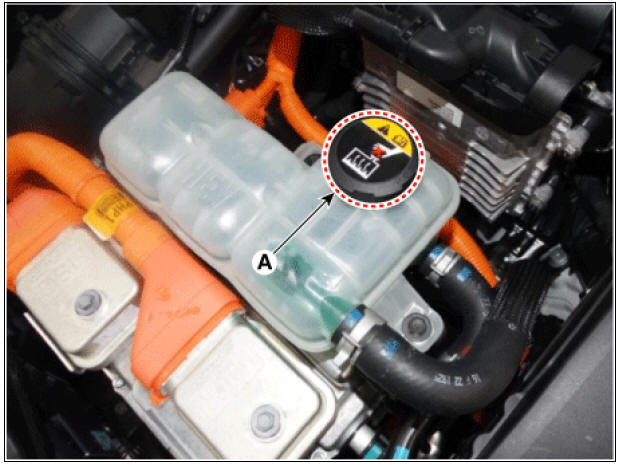
- Remove the inverter reservoir cap (A) to help drain the coolant faster.
- Remove the under cover.
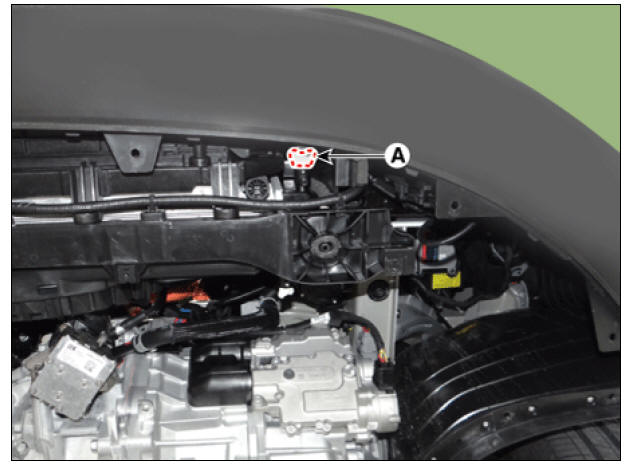
- Remove the drain plug (A), allow the coolant to drain out and then reinstall the drain plug.
Tightening torque : 7.8 - 11.8 N*m (0.7 - 1. 4 kgf.m, 5.8 - 8.7 lb*ft)
- After draining coolant from the reservoir tank, clean the tank.
- Fill the radiator with water through the inverter reservoir cap and tighten the cap.
Warning
To most effectively bleed air, slowly pour water while pressing on the upper/lower radiator hoses.
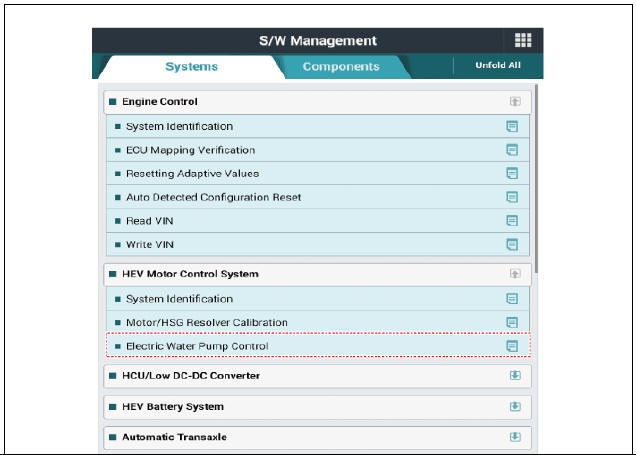
- Switch "ON" the ignition and then perform the EWP actuation using KDS.

- Repeat steps 1 to 6 until the drained water runs clear.
- Fill the reservoir with coolant. Slowly fill with the fluid mixture of coolant and water (45 - 50%).
Warning
- Use only genuine antifreeze / coolant.
- For best corrosion protection, the coolant concentration must be maintained year-round at 45% minimum. Coolant concentrations less than 55% may not provide sufficient protection against corrosion or freezing.
- Coolant concentrations greater then 60% will impair cooling efficiency and are not recommended.
- Perform the EWP actuation using KDS.
- While the EWP operates and coolant circulates, refill coolant so that the coolant level is kept between "MAX" and "MIN" levels.
Warning
If the EWP operates without a sufficient amount of coolant for approximately 5 seconds, the EWP protection function will be activated to stop the EWP for about 15 seconds. The EWP will start operating automatically when a sufficient amount of coolant is added.
- Air bleeding procedure of the coolant system is completed when the EWP operating sound gets lower and no more air bubbles are seen from the reservoir. (It would take about 3 - 5 minutes.)
Warning
After air bleeding, make sure that no air bubbles are present in the reservoir during the EWP actuation. If the coolant flow is not visible or air bubbles are still present, repeat steps 8 to 11.
- After air bleeding, stop the EWP, add coolant to the "MAX" level, and install the reservoir cap.
READ NEXT:
 Driveshaft and axle
Service Data
Tightening Torques
Lubricants
Special Service Tools
Tool Name / Number/ Illustration/ Description
Ball joint puller
09568-34000/ / Remove the ball
joint
Puller
09495-33000/ /Used for removal of
spider assembly
Front Driveshaft Repair procedures
Component location
Inner shaft bearing bracket
Drive shaft (RH)
Drive shasft (LH)
Front Driveshaft Repair procedures
Removal
Remove the wheel and tire.
Tightening torque:
107.9 - 127.5 N*m (11.0 - 13.0 kgf*m, 79.6 - 94.0 lb*ft
SEE MORE:
Engine compartment fuse panel (Kia NIRO Hybrid)
Engine Room Junction Block
MULTI
FUSE
C/FAN2// 80 A/
Cooling Fan Motor
MULTI
FUSE
PTC HEATER1/ / 50 A/
PTC HEATER #1 RELAY
B+2/ / 60 A/ ICU
JUNCTION BLOCK (IPS)
MULTI
FUSE
M
Hybrid Motor System
Specifications
Hybrid Drive Motor
Hybrid Starter Generator (HSG)
Electric Water Pump (EWP)
Coolant
Tightening Torques
Special Service Tools
Tool Name /
Number/
Illustration / Description
Pressure cap
pressure
checke
Categories
- Home
- KIA Niro EV, Hybrid - Second generation - (SG2) (2021-2024) - Owner's manual
- Kia Niro - First generation - (DE) (2017-2022) - Service and Repair Manual
- Contact Us