KIA Niro: Fender Garnish / Quarter Garnish Repair procedures, Front / Rear Wheel Guard Repair procedures
Kia Niro - First generation - (DE) (2017-2022) - Service and Repair Manual / Body (Interior And Exterior) / Body Side Molding / Fender Garnish / Quarter Garnish Repair procedures, Front / Rear Wheel Guard Repair procedures
Fender Garnish Repair procedures
Replacement
Warning
Put on gloves to protect your hands.
Warning
- Use a plastic panel removal tool to remove interior trim pieces without marring the surface.
- Be careful not to bend or scratch the trim and panels.
- Loosen the fender garnish mounting screws.
- Using a remover, remove the fender garnish (A).
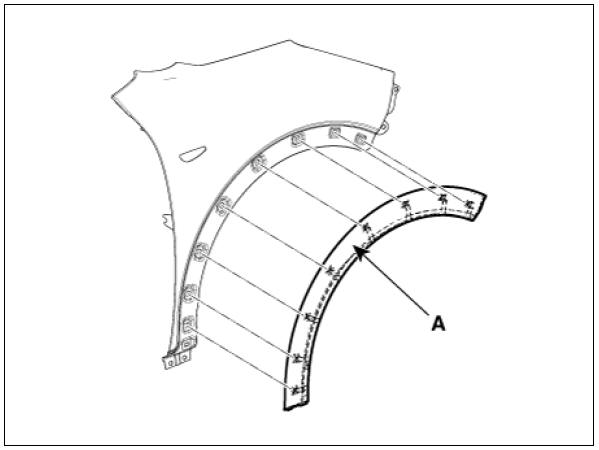
- Install in the reverse order of removal.
Warning
Replace any damaged clips.
Quarter Garnish Repair procedures
Replacement
Warning
Put on gloves to protect your hands.
Warning
- Use a plastic panel removal tool to remove interior trim pieces without marring the surface.
- Be careful not to bend or scratch the trim and panels.
- Using a remover, remove the fender garnish (A).
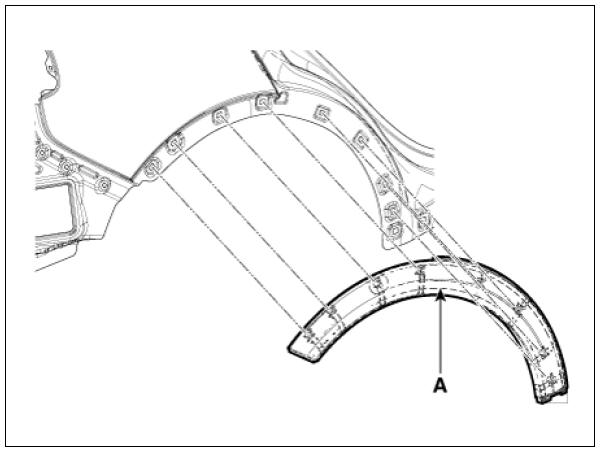
- Install in the reverse order of removal.
Warning
Replace any damaged clips.
Front / Rear Wheel Guard Repair procedures
Front Wheel Guard Repair procedures
Replacement
Warning
Put on gloves to protect your hands.
Warning
- Use a plastic panel removal tool to remove interior trim pieces without marring the surface.
- Be careful not to bend or scratch the trim and panels.
- Remove the front tire.
- Remove the front wheel guard (A), after loosening the mounting clips and nuts.
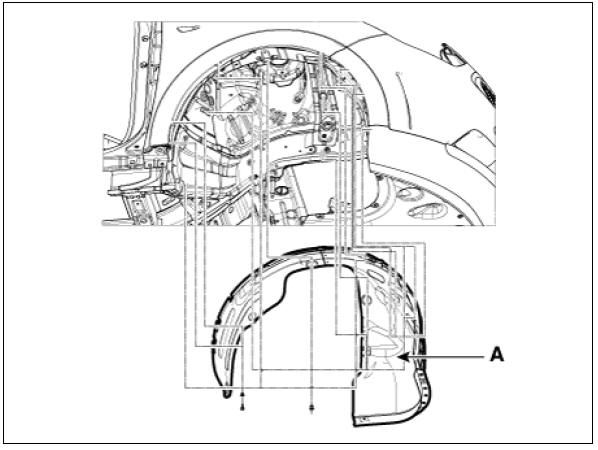
- Install in the reverse order of removal.
Warning
Replace any damaged clips.
Rear Wheel Guard Repair procedures
Replacement
Warning
Put on gloves to protect your hands.
Warning
Use a plastic panel removal tool to remove interior trim pieces without marring the surface.
Be careful not to bend or scratch the trim and panels.
- Remove the rear tire.
- Remove the rear wheel guard (A), after loosening the mounting clips and nuts.
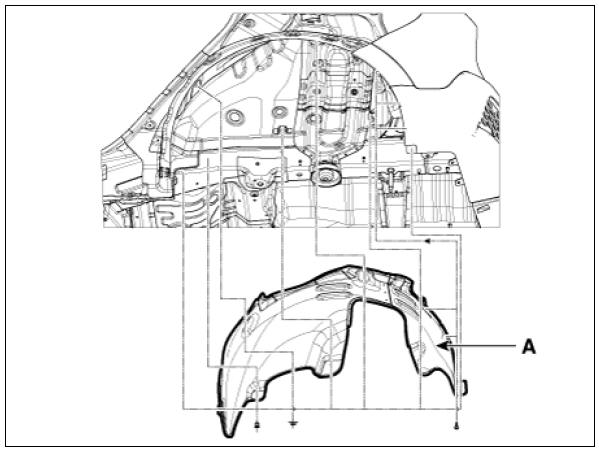
- Install in the reverse order of removal.
Warning
Replace any damaged clips.
READ NEXT:
 Waist Line Molding Repair procedures
Replacement
Warning
Put on gloves to protect your hands.
Warning
Use a plastic panel removal tool to remove interior trim pieces
without marring the surface.
Be careful not to bend or scratch the trim and panels.
Using a remover, re
Cowl Top Cover
Cowl Top Cover / Components And Components Location
Cowl top cover
Cowl Top Cover / Repair Procedures
Replacement
Warning
Put on gloves to protect your hands.
Warning
Use a plastic panel removal tool to remove interior trim pieces
SEE MORE:
Additional safety precautions
Never let passengers ride in the
cargo area or on top of a foldeddown
back seat. All occupants
should sit upright, fully back in their
seats with their seat belts on and their
feet on the floor.
Passengers should not move out of
or c
Charging cable storage (if equipped)
We recommend that the trickle charger
cable should be put in the storage box
after use.
Charging status indicator lamp for portable charger
Status/Diagnosis/Countermeasure
Charging connector plugged into
vehicle (POWER Green
Categories
- Home
- KIA Niro EV, Hybrid - Second generation - (SG2) (2021-2024) - Owner's manual
- Kia Niro - First generation - (DE) (2017-2022) - Service and Repair Manual
- Contact Us