KIA Niro: Memory Power Seat Switch
Kia Niro - First generation - (DE) (2017-2022) - Service and Repair Manual / Body Electrical System / Integrated Memory System (IMS) / Memory Power Seat Switch
Connector and Terminal Function
Memory power seat switch Repair procedures
Removal
- Disconnect the negative (-) battery terminal.
- Remove the driver front door trim.
(Refer to Body - "Front Door Trim")
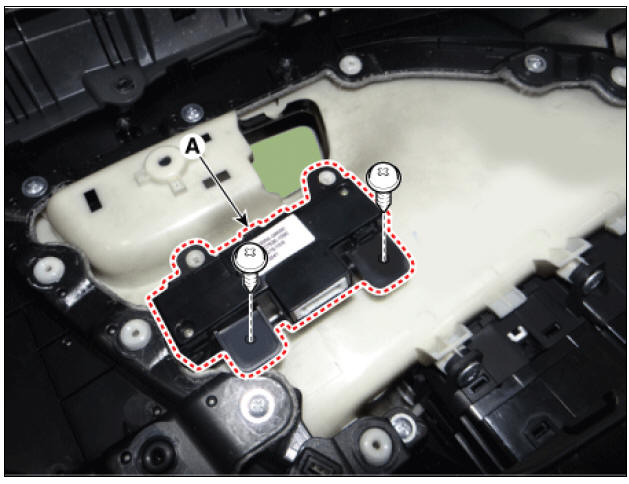
- Remove the memory power seat switch (A) after loosening the mounting screws.
Installation
- Install in the reverse order of removal.
Inspection
- Remove the memory power seat connector.

- When each switch is pressed, check the electricity flow between memory power seat switch connector and grounding, and if the electricity does not match the specification, replace the switch.
READ NEXT:
 Keyless Entry And Burglar Alarm / Description And Operation
Keyless Entry And Burglar Alarm / Components And Components Location
Specification
Hood switch
Horn (High-pitch)
Horn (Low-pitch)
Body control module (BCM)
Door lock/unlock buzzer
Front door actuator & switch
Rear door ac
Keyless Entry And Burglar Alarm / Repair Procedures
Inspection
Warning
When removing with a flat-tip screwdriver or remover, wrap
protective tape around the tools to
prevent damage to components.
When removing the interior trim pieces, use a plastic panel
removal tool not to damage the
SEE MORE:
Connector Inspection Procedure
Handling of Connector
a. Never pull on the wiring harness when disconnecting connectors.
b. When removing the connector with a lock, press or pull locking lever.
c. Listen for a click when locking connectors. This sound indicates that
SRS components and functions
* The actual features in your vehicle may
not necessarily be available due to the
selected options or regions.
Driver's front air bag module
Passenger's front air bag module
Side air bag modules*
Curtain air bag modules*
Ret
Categories
- Home
- KIA Niro EV, Hybrid - Second generation - (SG2) (2021-2024) - Owner's manual
- Kia Niro - First generation - (DE) (2017-2022) - Service and Repair Manual
- Contact Us