KIA Niro: Replacing main/multi fuses
KIA Niro EV, Hybrid - Second generation - (SG2) (2021-2024) - Owner's manual / Maintenance / Fuses / Replacing main/multi fuses
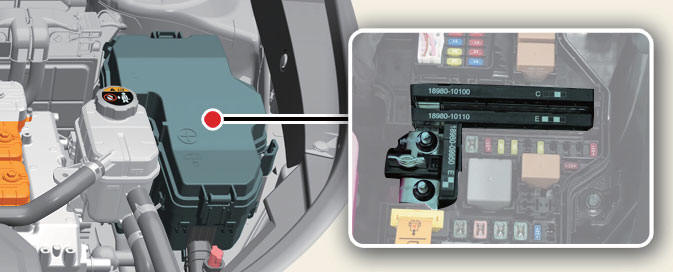
Operation
- Turn off the vehicle.
- Remove the fuse panel cover by pressing the tab and pulling the cover up.
- Disconnect the negative battery cable.
- Remove the nuts shown in the picture above.
- Replace the fuse with a new one of the same rating.
- Reinstall in the reverse order of removal.
- If it fits loosely, consult a professional workshop. Kia recommends to consult an authorized Kia dealer/service partner.
Replacing relay
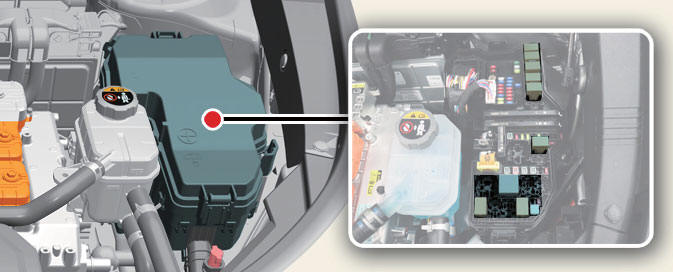
- Turn the vehicle and all other switches off.
- Remove the fuse panel cover by pressing the tab and pulling the cover up.
- Replace the relay with a new one of the same rating.
- Reinstall in the reverse order of removal.
- If it fits loosely, consult a professional workshop. Kia recommends to consult an authorized Kia dealer/service partner.
CAUTION
- After checking the fuse panel in the engine compartment, securely install the fuse panel cover through the audible clicking sound. If not, electrical failures may occur from water contact.
- Visually inspect the battery cap for secure closing. If the battery cap is not securely latched, the electrical system may be damaged to due influx of moisture into the system.
NOTICE
- The electronic system may not function correctly even when the engine room and internal fuse box's individual fuses are not disconnected. In such case the cause of the problem may be disconnection of the main fuse (BFT type), which is located inside the positive battery terminal (+) cap. Since the main fuse is designed more intricately than other parts, visit a professional workshop. Kia recommends to visit the nearest authorized Kia dealer/service partner.
- If the multi fuse is blown, consult a professional workshop. Kia recommends to consult an authorized Kia dealer/service partner.
Fuse/relay panel description
Inside the fuse/relay panel covers, you can find the fuse/relay label describing fuse/relay name and capacity.
NOTICE
Not all fuse panel descriptions in this manual may be applicable to your vehicle.
It is accurate at the time of printing.
When you inspect the fuse panel in your vehicle, refer to the fuse panel label.
READ NEXT:
 Driver's side fuse panel (Kia NIRO Hybrid)
For HEV vehicle
For PHEV vehicle
ICU Junction Block
Fuse Name/ Symbol/
Fuse rating/ Circuit Protected
AMP / / 30
A/ AMP (Amplifier)
P/SEAT DRV/
/ 30 A/ Driver Lumbar Support
Switch, Driver Power Seat Switch, IMS (I
Driver's side fuse panel (Kia Niro EV)
ICU Junction Block
Fuse Name/ Symbol/ Fuse Rating/ Circuit Protected
CHILD LOCK/ / 15A/
Child Lock Relay, Child Unlock Relay
MODULE 7/ / 7.5A/
Front Seat Control Unit, Rear Seat Warmer, AC Inverter
E-S
SEE MORE:
Door lock features (Kia NIRO Hybrid)
Your vehicle is equipped with features
that will automatically lock or unlock
your vehicle based on settings you
select in the cluster or infotainment system
screen.
Auto lock enable on speed
When this feature is set in the cluster or
infotain
Charging and climate
A: Electric Vehicle
Scheduled charging and target
temperature
Select EV → Scheduled charging and
target temperature on the screen.
NOTICE
Vehicle must be connected with the
charging connector at the time prescheduled
time for the
Categories
- Home
- KIA Niro EV, Hybrid - Second generation - (SG2) (2021-2024) - Owner's manual
- Kia Niro - First generation - (DE) (2017-2022) - Service and Repair Manual
- Contact Us