KIA Niro: Auto Lighting Control System
Kia Niro - First generation - (DE) (2017-2022) - Service and Repair Manual / Body Electrical System / AC Inverter System / Auto Lighting Control System
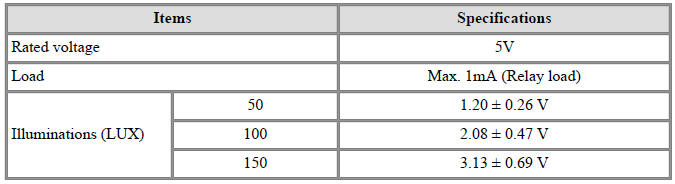
Specifications
Auto Lighting Control System / Components And Components Location
- Auto light sensor
- Headlamps
- Lighting switch (Auto)
- Rear combination lamps
- BCM (Body Control Module)
Description
- It's a system that uses illumination sensor to automatically turn ON the tail lamp and head lamp based on the change in surrounding environment's illumination condition.
- It activates when the vehicle enters/exits tunnel, or when the illumination condition in surrounding environment changes due to rain, snow, or fog.
Auto Lighting Control System / Schematic Diagrams
Auto Light Sensor Repair procedures
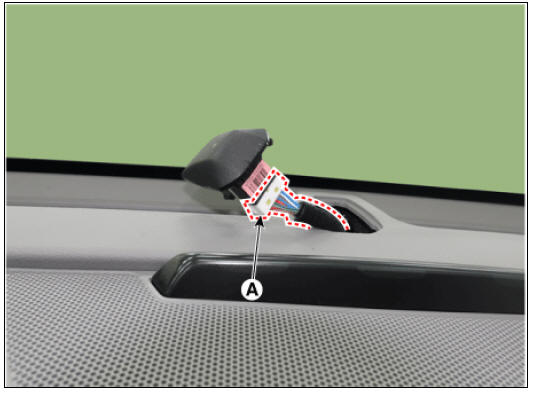
Removal
- Remove the auto light sensor (A) from the main crash pad.

- Disconnect the connector (A) from the auto light sensor.
Installation
- Install in the reverse order removal.
READ NEXT:
 AVN System / Description And Operation
AVN System / Components And Components Location
AVN head unit
External amplifier
Crash pad LTE antenna
Roof LTE antenna
Multimedia jack
Steering wheel remote control (SWRC)
Hands-free mic (Built-in overhead console)
Description
Vehicle Information Systems (UVO)
AVN head unit
Crash pad LTE antenna (Wi-Fi, LTE 2)
UVO Keypad
Roof LTE antenna (AM/FM + DMB + GPS + LTE 1)
Description
Vehicle information systems (UVO) based on state-of-the-art IT systems,
safety and security
Warning
The term &
SEE MORE:
Rear Center Seat Belt Retractor
Rear center seat belt retractor
Replacement
Warning
When installing the belt, be careful not to damage the retractor.
Remove the rear seat back dust cover.
(Refer to Rear Seat - "Rear Seat Back Cover")
Remove the rear ce
Power limited
A: Power limited
In the following cases, this warning message
is displayed when the vehicle's
power is limited for safety.
When the power is limited for the
safety of the high-powered parts of
an electric vehicle. The power is limi
Categories
- Home
- KIA Niro EV, Hybrid - Second generation - (SG2) (2021-2024) - Owner's manual
- Kia Niro - First generation - (DE) (2017-2022) - Service and Repair Manual
- Contact Us