KIA Niro: Rear Oil Seal Repair procedures
Kia Niro - First generation - (DE) (2017-2022) - Service and Repair Manual / Engine Mechanical System / Cylinder Block / Rear Oil Seal Repair procedures
Replacement
Warning
- Be sure to read and follow the "General Safety Information and Caution" before doing any work related with the high voltage system. Failure to follow the safety instructions may result in serious electrical injuries.
- Be sure to shut off the high voltage circuit according to the "High Voltage Shut-off Procedures" before doing any work related with the high voltage system to avoid serious electrical injuries.
- Shut off the high voltage circuit.
(Refer to Engine Mechanical System - "High Voltage Shut off Procedure")
- Remove the dual clutch transmission.
(Refer to Double Clutch Transmission (DCT) - "Double Clutch Transmission Assembly")
- Remove the engine clutch disk and clutch cover.
(Refer to Engine Clutch System - "Clutch Cover and Disk")
- Remove the flywheel.
(Refer to Cylinder Block - "Flywheel")
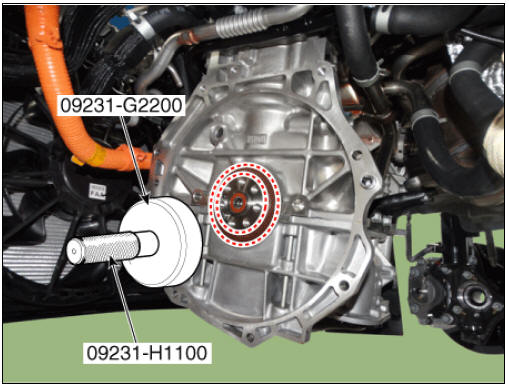
- Remove the rear oil seal (A).

- Apply engine oil on new oil seal lip.
- Using the SST (09231-H1100, 09231-G2200) and a hammer, tap in the oil seal until its surface is flush with the rear oil seal retainer edge.
- Install in the reverse order of removal.
Warning
Always use new rear oil seal.
READ NEXT:
 Piston and Connecting Rod Repair procedures
Disassembly
Warning
Be sure to read and follow the "General Safety Information and
Caution" before doing any work related
with the high voltage system. Failure to follow the safety instructions may
result in serious electrical
injuries
Connecting Rod
Check the connecting rod side clearance.
Using a feeler gauge, measure the end play while moving the connecting rod
back and forth.
If out-of-tolerance, install a new connecting rod.
If still out-of-tolerance, replace the crankshaft.
Piston, rings
Clean piston.
(1) Using a gasket scraper, remove the carbon from the piston top.
(2) Using a groove cleaning tool or broken ring, clean the piston ring grooves.
(3) Using solvent and a brush, thoroughly clean the piston.
Warning
Do not
SEE MORE:
Сharge port
Description
Location of normal charge port in the front fender of vehicle. The charge
starts when the ICCB or the
is connected to charge port.
Removal
Warning
Be sure to read and follow the "General Safety Information and
Ca
Collision warning
A: Collision warning!
While Smart Cruise Control is operating,
when the collision risk with the vehicle
ahead is high, the warning message will
appear on the cluster, and an audible
warning will sound to warn the driver.
Always have your
Categories
- Home
- KIA Niro EV, Hybrid - Second generation - (SG2) (2021-2024) - Owner's manual
- Kia Niro - First generation - (DE) (2017-2022) - Service and Repair Manual
- Contact Us